Index
Getting Started
Adding a Post
Adding Categories and Tags
Adding a Page
Adding Pictures and Media to a Post or Page
Using Comments
Widgets
Basics: Getting Started
Wooster ScotBlogs run on a platform called WordPress μ. This software is used to power millions of blogs used for any number of topics, from online magazines, organization websites and personal blogs to the WordPress site itself. This software has gained this much popularity by being extremely easy to learn to use and update and requires no technical knowledge in order to use its basic features.
The first step in maintaining your ScotBlog is to access the backend Dashboard, also known simply as the Dashboard. The Dashboard is the administrative section of the WordPress software, which allows blog authors to add new posts, pages and links to your blog.
To access the Dashboard:
1. Navigate your browser to your blog

2. Scroll down and find the Log In link on the right side of the page (or use http://yourblog.scotblogs.wooster.edu/wp-admin)

3. Click the link and enter your Wooster username and password when prompted. This will take you to the backend, which looks like this:

From the Dashboard, you can perform all the actions necessary to update and maintain your ScotBlog, including adding new posts to your main blog, adding pages that can contain static information relevant to your blog (e.g. contact info, mission statement, ect.) and links or widgets in the sidebar on the right.
Adding a Post
Once you have accessed your blog’s Dashboard, there are only a few steps left to take in order to add content to your blog. The main method of updating a blog is called Posting. When you publish a post, it appears on the main page of your blog at the top of the body content area, and all previous posts are moved down, so the most relevant post is always up top.
To add a post:
1. Click the Posts tab.

2. Click the Add New Sub-Tab in the Posts menu

3. Start filling in the blank fields. The absolutely necessary fields are the Title and Body fields, as these are the two things that will appear on your blog’s homepage when you publish your post. The body field functions just like a standard text editor such as Microsoft Word, so formatting and images can be added by way of the buttons at the top of the editor. For info on adding pictures, see the next section in this guide. For explanations of each of the fields available, see: http://codex.wordpress.org/Writing_Posts

4. Select a category or categories and add tags. While these options are not immediately visible to your blogs visitors, they are nonetheless important.
Categories keep your posts organized and help both you and your blogs viewers find the posts you are looking for. Examples of categories could be “News” or “Important”, or be more broad, such as “Music”, or more specific, such as “English Papers”. Later in this guide I will explain how to create your own categories.
Tags help search engines like Google find your site and posts and keep its search results relevant, as well as informing your viewers of the specifics of this particular post. Tags are different from categories in that they are not necessarily meant to organize your posts into separate groups, but describe in as simple a way possible the post’s content. So, for example if a post was an English paper about dog breeds, its category might be “English Papers” but its tags could be “English”, “Dogs”, “Breeds”, and “Poodles”.
Note that there is no limit to the number of tags or categories a post can have. You can add as many or as few as you like, but by being more rigorous in your tagging, you make your blog’s posts more accessible to the world.

5. When you are ready, click Publish, and your post will appear on your blog.
Adding Categories
Adding Categories to your posts and pages can help to keep your posts organized. Naturally, WordPress’ default categories are unlikely to encompass every post or page you might want on your blog, so creation of your own categories is a helpful tool.
To create Categories:
1. Navigate to the Dashboard and click the Posts tab.
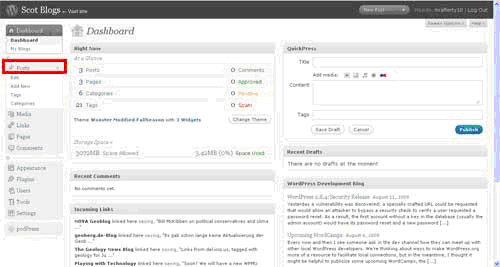
2. Click on the Categories sub-tab in the Posts menu.
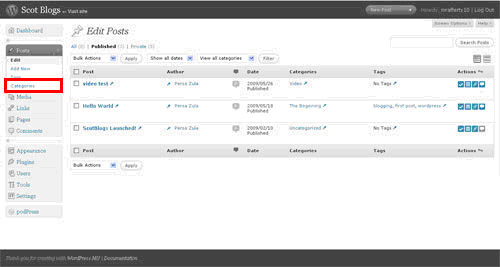
3. You are now on the Category management page. In the left-center of the page you should see the add category fields. Enter a Title and optionally a ‘parent’ category and description for the category.
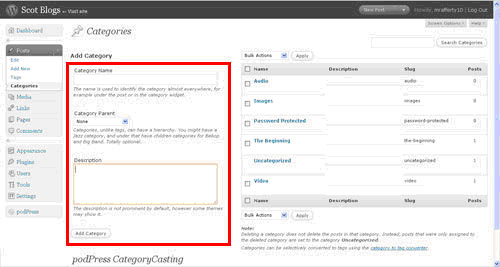
A note about the ‘parent’ of a category. This is entirely optional, however it can be helpful at times. The WordPress Codex explains parent categories as such:
Categories, unlike tags, can have a hierarchy. You might have a Jazz category, and under that have children categories for Bebop and Big Band. Totally optional.
So, if you had created a post in the Bebop category, it would also be in the Jazz category, however posts only in the Jazz or Big Band categories would not show up if you looked up only Bebop.
4. Once you are ready, hit the Add Category button to create your new category. Once you do, your category will be available to be used on all posts and pages. If you want to add it to previously existing posts or pages, you will need to go back and edit them to add the new category.
Adding a Page
The process of creating Pages is almost exactly the same as adding posts, however pages have a distinctly different purpose. When you publish a page, rather than appearing as a blog post on your homepage, the page’s title will appear as a link in the navigation bar. This allows you to keep important information separate and easily available while still being able to update your blog.
To add a Page:
1. Go to the Dashboard and click on the Pages tab

2. Click the Add New sub-tab in the Pages menu
3. Fill in the Title, Body Content, Tags, Categories and any optional fields just as you would in a post. Remember that the title you choose here will appear as the link in the navigation throughout your ScotBlog.
4. When you are ready, hit Publish to add your page to your blog.
A note about posts and pages: if you ever need to make changes or corrections both posts and pages can be edited by clicking on a post or page’s title after clicking on the post or page tab.
Adding Pictures and Media to a Post or Page
Adding Media (pictures, videos, audio, and files) to your posts and pages in WordPress is very simple. Before you get started, make sure you have the file (we will be adding a picture in this tutorial) you want to upload is saved on your computer in a location you can easily navigate to.
To add a Picture:
1. Follow the steps from the section on adding a post or page to get to the edit page.
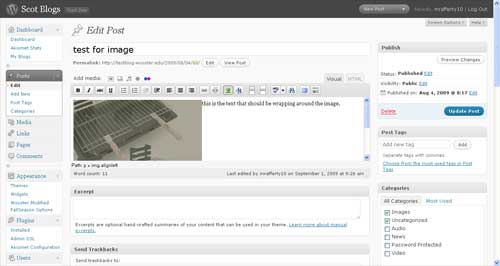
2. Click on the Add Image button above the main post body area. If you are adding another piece of media, say a PDF or Word file you want visitors to be able to download, the method below is almost identical, except you should hit the appropriate button during this step.
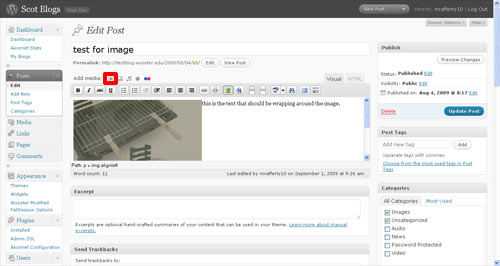
3. Hit the Select Files button and select the image you would like to upload. Click open to upload the image. (Note: If an error occurs, select the “Use Browser Uploader” button)
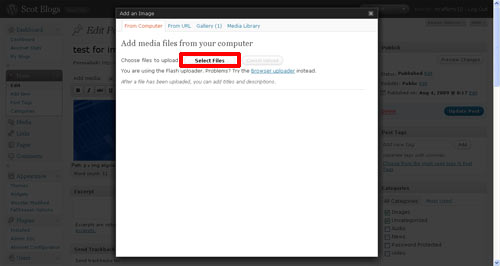
4. Fill out the image’s properties. You can add a Caption that will appear below the image, and a description that will appear if your visitors hover over the image. If you want visitors to be able to click the picture to bring them to another page, add that page’s URL to the Link URL. Select an Alignment and Image Size. (if you are unsure about these settings see the note below) If you are not adding an image, some of these options may be unavailable.
A note about image Alignment: While you can leave this setting as its default, this will probably not look the way you want. The Alignment affects where on your post or page your image will go, and how the text around it will flow. You should choose Left, Right, or Center. Left and Right place the image on the far left or right of the line it is on and wraps the text along the side of the image. Center places the image on its own line in between the text around it. If you are unsure, choose Right as this does not break the text at all.
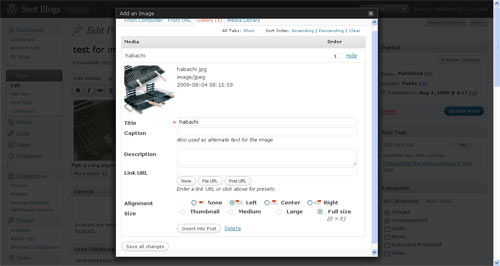
5. When you are finished, click the Insert Into Post button and the image should appear in your post. From here you can continue editing your post, or if you are finished hit Publish as usual to post your post or page along with its image to your ScotBlog.

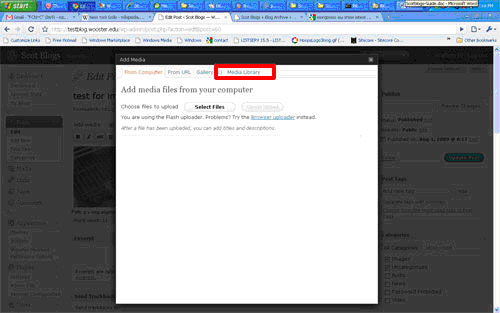
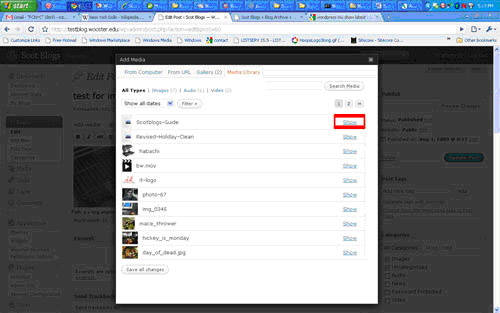
6. If you want to add this image or any other piece of media you have ever uploaded to another post or page in the future, there is no need to upload it again and fill out its fields a second time. All media items are stored in the Media Library. To access the media library, choose the type of media you want to add and press its button on the new post page. This will bring up the upload dialogue.
7. Instead of choosing a picture to upload, hit the Media Library button along the top of the window.
 <
<
8. You will see a list of every media item you have ever uploaded. To bring up an item’s information, click show next to the item you want to see. You will then be able to add that item to your post if you choose.
A Note About the Media Library: You can also access the Media Library from your Dashboard, as shown below:
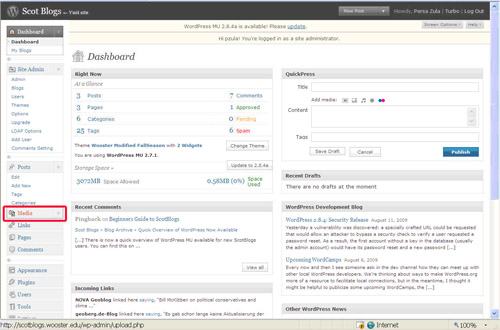
The Media Library window will allow you to add, edit, delete, and rename files for your use throughout your blog.
Using Comments
Visitors to your blog have the ability to leave feedback about your posts by clicking on the Comments link that WordPress automatically places at the bottom of each post.
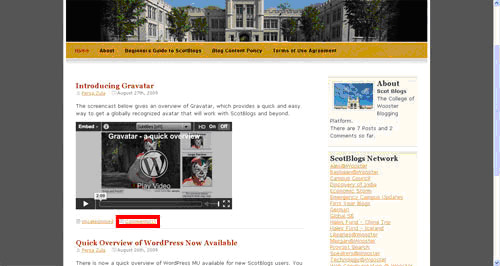
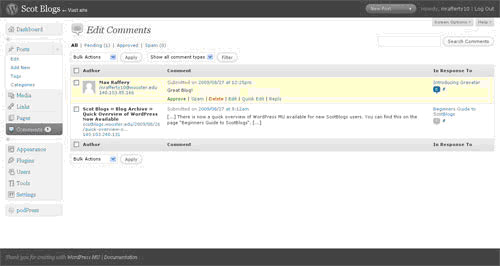
To prevent spam or inappropriate comments, all comments must be approved by a ScotBlog administrator. This can be done from the Dashboard.
To Approve Comments on your posts:
1. Navigate to the Dashboard
2. On the Dashboard, you may notice that the comments tab in the lefthand menu has a number next to it. If it does, you have unapproved comments. You may also see a notice about an unapproved comment on the Dashboard. Moving your mouse over the notice will allow you to approve the comment directly from the Dashboard. However, if you have a large number of comments or this notice does not appear on the Dashboard, you will need to click on the comments tab.
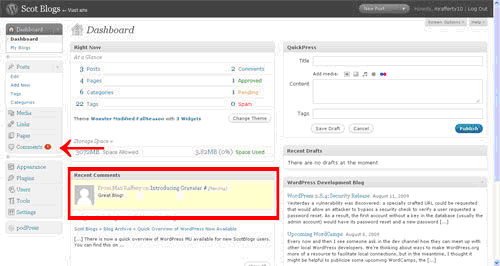
3. After clicking on the comments tab you will be taken to the comment moderation page. This page is fairly straightforward and is just a list of every comment on any and all posts on your blog. There are links along the top of the page that allow you to sort the comments. If you click on ‘pending’ only unapproved comments will be shown. This is useful if you have a number of comments you want to approve at once, using Bulk Actions. Otherwise, just mouse over a comment and a list of options will appear, which will allow you to approve, delete, respond to or mark as spam any comment on your blog.
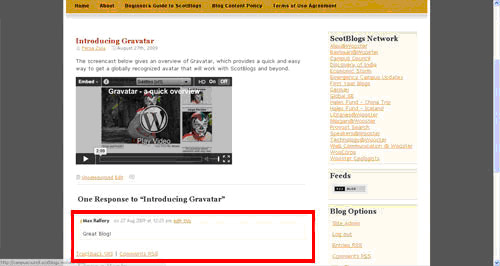
4. Once you have approved comments, they can be seen on your blog by clicking the ‘Comments’ link on any of your posts.
Widgets
As you have explored your ScotBlog, you may have noticed a space on the right of your blog containing various pieces of information.
 <
<
This is called the Widget Bar. Each small block of information on the widget bar is called a Widget. There are many different widgets you can add to your ScotBlog in WordPress.
One of the simplest widgets to add is the Text Widget. This widget simply displays a small bit of text in your widget bar, be it a heading, a quote or instructions of some kind.
To add a Text Widget:
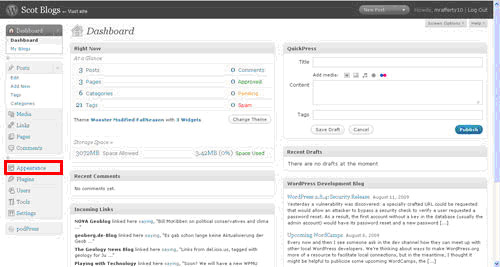
1. Navigate to the Dashboard and click on the Appearance tab.
2. Click on the Widgets sub-tab in the Appearance Menu
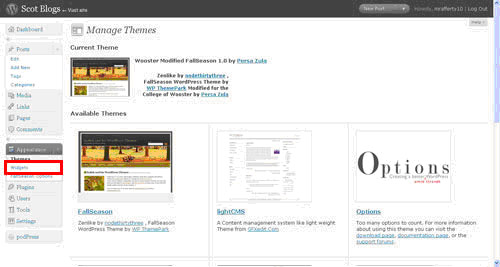
3. You should now be on the widget management page. On the far right you can see your active widgets and edit their options. It is recommended that you not modify the widget called “Blog Options”, otherwise you will lose the ‘log in’ link on your blog, making it difficult to log back into the Dashboard later.
Scroll down on the page and find the Text widget in the center-left column and click add. The text widget will appear at the bottom of your active widgets on the right.
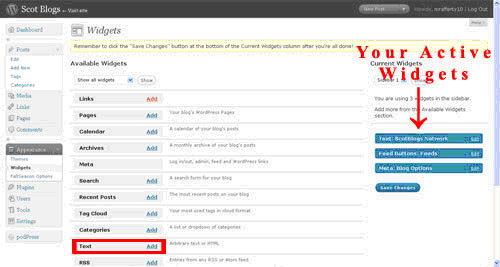
4. The Text widget is now active, but has no information. Click Edit in the Text Widget box to add your text. Once you hit edit, the box will expand, allowing you to add text. If you want to remove the widget, hit the remove button at the bottom of the edit box.
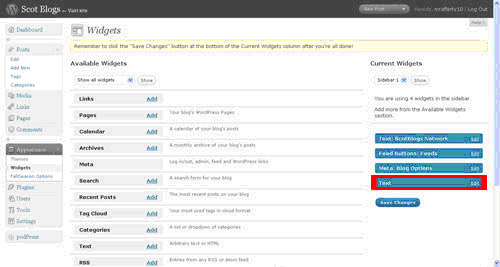
5. Once you are finished, hit Done in the edit box and hit Save Changes to make your current widget configuration fully active.
A note about Widgets: you can click and drag your active widgets in order to arrange them as you see fit. If you rearrange the widgets you will need to hit Save Changes again to make your blog reflect the changes.
There are many other widgets to add. If you use categories, you can add a list of all your categories as links to those posts and pages to the widget bar by adding the Categories Widget. You can also set up a list of external links by adding the Links Widget, though this widget requires you to add your links from the Links Tab on the Dashboard. Feel free to experiment with widgets, as nothing on this page is final until you hit Save Changes, with the exception of removing currently active widgets.
If you want to learn more…
You now have all the basic skills necessary to maintain your ScotBlog! Should you need more guidance or simply wish to know more, visit the WordPress Codex (http://codex.wordpress.org/) for a number of additional tutorials and information about the WordPress platform and additional features!

Pingback: Scot Blogs » Blog Archive » Quick Overview of WordPress Now Available
Pingback: Web Communication @ Wooster » Blog Archive » Moving forward